
Affymetrix Genexpression Analysis by GeneChip Human Gene ST 2.0 Arrays.
Judith Sunzenauer (last update 2.4.2013)
Procedures
Amplification:
First Strand cDNA Synthesis:
- Add 5 µL of total RNA sample (200 ng) to a 0.2 mL PCR tube.
- Add 2 µL of A1 to each reaction tube.
- Mix by pipetting 5 times, spin and place on ice.
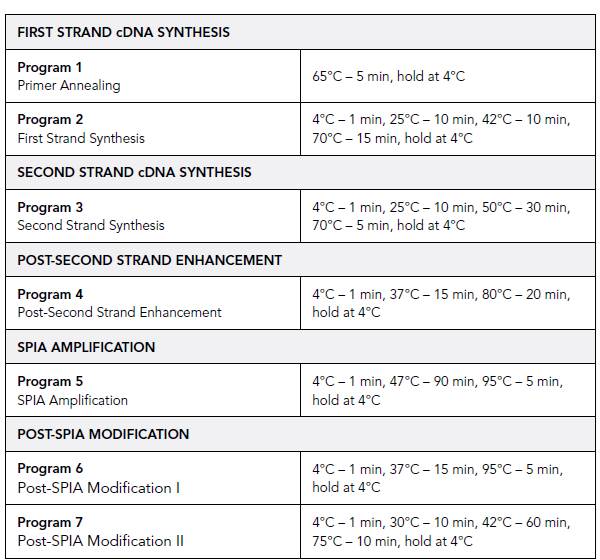
- Place the tubes in a pre-warmed thermal cycler programmed to run Program 1. When finished place on ice.
- Mix 2,5 µl A2 and 0,5 µl A3 in a 0.5 mL capped tube.
- Add 3 µL of the First Strand Master Mix to each tube. Mix by pipetting.
- Run thermal cycler program 2 (has to be pre-cooled).
- Zip spin and place on ice.
Second Strand cDNA Synthesis:
- Mix 9,75 µl B1 and 0,25 µl B2 in a 0.5 mL capped tube.
- Add 10 µL of the Second Strand Master Mix to each First Strand reaction tube. Mix by pipetting.
- Run thermal cycler program 3 (has to be pre-cooled).
- Zip spin and place on ice.
Post-Second Strand Enhancement:
- Mix 3,7 µl B1 and 0,3 µl B3 in a 0.5 mL capped tube.
- Add 2 µL of the Enhancement Master Mix to each Second Strand reaction tube. Mix by pipetting.Note: Save the remaining Enhancement Master Mix on ice. It will be used in the Post-SPIA Modification
- Run thermal cycler program 4 (has to be pre-cooled).
- Zip spin and place on ice.
SPIA Amplification:
- Mix 2,5 µl C2, 2,5 µl C1 and 5 µl C3 in a 0.5 mL capped tube.
- Add 10 µL of the SPIA Master Mix to the Post-Second Strand Enhancement reaction. Mix by pipetting.
- Run thermal cycler program 5 (has to be pre-cooled).
- Zip spin and place on ice.
Note: Continue with Post-SPIA Modification or store at -20 °C overnight.(Enhancement Master Mix cannot be stored overnight, so only prepare half of the volume, if you do not continue immediately)
Post-SPIA Modification I:
- Mix 2 µl of Enhancement Master Mix and 6 µl E1 in a 0.5 mL capped tube.
- Add 8 µL of the Post-SPIA Modification I Master Mix to the SPIA Amplification reaction. Mix by pipetting.
- Run thermal cycler program 6 (has to be pre-cooled).
- Zip spin and place on ice.
Post-SPIA Modification II:
- Mix 6 µl E2 and 6 µl E3 in a 0.5 mL capped tube.
- Add 12 µL of the Post-SPIA Modification II Master Mix to the Post-SPIA Modification I reaction. Mix by pipetting.
- Run thermal cycler program 7 (has to be pre-cooled).
- Zip spin and place on ice.
Note: Continue with ST-cDNA Protocol or store at -20 °C
Purification of ST-cDNA:
- Pipette 300 µl Buffer ERC from the QIAGEN MinElute Reaction Cleanup Kit into a 1,5ml Eppi.
- Add 47 µl of the Post-Spia Modification II reaction. Vortex for 5 seconds, then spin briefly.
- Load the entire volume onto the MinElute spin column.
- Centrifuge for 1min at maximum speed.
- Discard the flow-through.
- Add 750 µL of Buffer PE to the column.
- Centrifuge for 1min at maximum speed.
- Discard the flow-through.
- Centrifuge for an additional 2mins at maximum speed.
- Discard the flow-through with the collection tube. Blot the column onto clean, absorbant paper to remove any residual wash buffer from the tip of the column. Place the column into a new 1,5ml Eppi.
- Add 15 µl a.dest directly onto the membrane. Incubate 1min.
- Centrifuge for 1min at maximum speed.
- Discard the column and measure the volume recovered. There should be approximately 12 to 15 µL of purified SPIA cDNA.
Measuring ST-cDNA Yield and Purity:
- Measure with nanodrop using 2 µl of a 1:5 dilution of single-stranded DNA.
- The purified ST-cDNA may be stored at –20 °C.
Labeling:
cDNA Fragmentation:
- Add 25 µL of the purified ST-cDNA (4,5 µg) to a 0.2 mL PCR tube.
- Mix 5 µl FL1 and 2 µl FL2 in a 0.5 mL capped tube.
- Add 7 µL of the Fragmentation Master Mix to each tube. Mix thoroughly by pipetting.
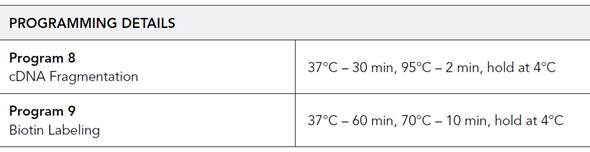
- Run thermal cycler program 8 (must be pre-warmed).
- Zip spin and place on ice.
Biotin Labeling:
- Mix 15 µl FL3, 1,5 µl FL4 and 1,5 µl FL5in a 0.5 mL capped tube.
- Add 18 µL of the Labeling Master Mix to each cDNA Fragmentation reaction tube. Mix by pipetting.
- Run thermal cycler program 9 (must be pre-warmed).
- Zip spin and place on ice.
Note: Use labeled cDNA immediately for Array Hybridization or store at -20 °C
Hybridization:
Note: Preheat three heating blocks, one at 65 °C, one at 45 °C and one at 99 °C.
- Hybridization Cocktail:
| Component | 1x |
|---|---|
| Fragmented and labeled cRNA | 42 µl |
| Control Oligonucleotide B2 (3nM) | 2,5 µl |
| 20X Eukaryotic Hybridization Controls | 7,5 µl |
| 2X Hybridization Mix | 75 µl |
| DMSO | 10,5 µl |
| Nuclease-free water | bring to 150 µl |
Note: It is imperative that frozen stocks of 20X GeneChip Eukaryotic Hybridization Controls are heated to 65 °C for 5 minutes to completely resuspend the cRNA before aliquoting.
- Equilibrate probe array to room temperature immediately before use.
- Heat the hybridization Mix to 99 °C for 5 min in a heat block. Cool to 45 °C for 5min and centrifuge at maximum speed for 1 min.
Note: In order to fill the array, first vent the array chamber by inserting a clean, unused pipette tip into one of the septa; then insert the pipette tip of a micropipettor into the remaining septum to fill. - Fill the array with the 130 µl of the clarified hybridization cocktail, avoiding any insoluble matter at the bottom of the tube.
- Place the array into the hybridization oven for 17h, rotate 60rpm at 45 °C.
Washing and Staining:
- Turn on the Fluidics station and select Run -> Fluidics from the menu bar.
- To prime the Fluidics station select protocol -> Prime_450 in the dialog box.
- Transfer Wash Buffer A+B to the clean and empty bottles in the Fluidics Station.
- If using GCOS choose All Modules -> Run.
After 17h of hybridization remove the array from the hybridization oven. Vent the array by inserting a clean pipette tip into one of the septa and extract the hybridization cocktail with a pipettor through the remaining septum. Refill the probe array completely with 160 µl Wash Buffer A.
- If necessary, at this point, the probe array can be stored at 4 °C for up to 3 hours before proceeding with washing and staining. Equilibrate the probe array to room temperature before washing and staining.
- Prepare the following aliquots per array. Gently tap the bottles to mix well:
- A. 600 µl of Stain Cocktail 1 into a 1,5ml amber Eppi
- B. 600 µl of Stain Cocktail 2 into a 1,5ml (clear) Eppi
- C. 800 µl of Array Holding Buffer into a 1,5ml (clear) Eppi.
- Zip spin to remove bubbles.
- Choose the correct experiment in the dialog box of the Fluidics Station. Select the antibody amplification protocol to control the washing and staining of the probe array format being used -> Flex FS450_0002 -> RUN.
- Insert the probe array into the designated module while the cartridge lever is down or in the eject position. When finished, verify that the cartridge lever is returned to the up, or engaged, position.
- Remove any Eppis remaining in the sample holder. Follow the instructions on the LCD window by placing the three experiment sample vials (Eppis) into the sample holders 1, 2 and 3.
- Press down on the needle lever to snap needles into position and to start the run.
- The run is complete when EJECT & INSPECT CARTRIDGE is displayed. Remove the probe arrays from the fluidics station modules by first pressing down the cartridge lever to the eject position.
- Check the probe array window for large bubbles and continue with scanning if the array does not contain large bubbles.
If bubbles are present, do the following: Return the probe array to the probe array holder. Follow instructions on the LCD window. Engage the washblock by gently pushing up on the cartridge lever to the engaged, or closed, position. The fluidics station will drain the probe array and then fill it with a fresh volume of Array Holding Buffer. When it is finished, EJECT & INSPECT CARTRIDGE is displayed.
- Keep the probe arrays at 4 °C in the dark until ready for scanning. Shut down the Fluidics Station: The window displays ENGAGE WASHBLOCK after removing a probe array from the holder. Lift up the cartridge lever to engage, or close, the washblock. The fluidics station automatically performs a cleanout procedure until REMOVE VIALS is displayed. Remove Eppis from the holders. If no other hybridizations are to be performed, place wash lines into a bottle filled with deionized water. Select Protocol ->shutdown_450 -> Run. After Shutdown is complete, switch OFF.
Scanning:
Make sure the laser is warmed up prior to scanning for 15min. If the probe array was stored at 4 °C bring to RT before scanning.
- On the back of the probe array cartridge, clean excess fluid from around septa. Carefully apply one tough-spot to each of the two septa. Ensure that the spots lie flat.
- Select Run -> Scanner from the menu bar. Select your experiment from the drop-down list of experiments, that have not been run -> click START button.
- Open the sample door on the scanner and insert the probe array into the holder. The door closes automatically through the User Interface when start scan is selected -> click OK.
Materials:
| GeneChip Human Gene 2.0 ST Arrays | Affymetrix | #902112 | |
| Applause WT-Amp Plus ST Kit | NuGen | #5500-24 | |
| Hybridization Controls | Affymetrix | #900454 | |
| MinElute Reaction Cleanup Kit | QIAGEN | #28204 | |
| Encore Biotin Module Kit | NuGen | #4200-12 | |
| Nanodrop-1000 | Thermo Scientific | ||
| GeneChip Hybridization, Wash and Stain Kit | Affymetrix | #900720 | |
| Hybridization Oven 640 | Affymetrix | #800139 | |
| Fluidics Station 450 | Affymetrix | #00-0079 | |
| GeneChip Scanner 3000G | Affymetrix |